![Hardware Factory Store Inc - Molecular Sieve Zeolite 3A 8X12m - [variant_title]](http://www.hfsusa.com/cdn/shop/products/ZELOITE-3A-0812-1_{width}x.jpg?v=1752558790)
![Hardware Factory Store Inc - Molecular Sieve Zeolite 3A 8X12m - [variant_title]](http://www.hfsusa.com/cdn/shop/products/ZELOITE-3A-0812-2_{width}x.jpg?v=1752558790)


HFS 12'' A4 Heavy Duty Guillotine Paper Cutter


DOWNLOAD MANUAL HERE
The HFS 12" Guillotine Paper Cutter is a commercial grade trimmer capable of cutting up to 400 sheets in a single pass. Save time. energy. and money when making many of the same cuts with this high quality cutter. Easily create half page flyers and save money on paper.
With an adjustable paper clamp. you are sure to get precise cuts every time as the razor harp blade cuts through up to a inch and a half of stacked paper. The blade is also easily replaceable. just take off a few screws and remove the blade when it needs to be sharpened.
Product Description
- Easy to Operate, Sturdy, Well Balanced Frame with Heavy Duty Construction.
- Professionally machined and assembled steel blade rail and sturdy blade assembly.
- Hardened precision steel blade customized at the factory. Blades can either be re-sharpened or replaced if needed.
- Machined steel side gauge with standard measures (1/32" resolution), protected with scratch resistant coating.
Features
- Heavy Duty Steel Base
- Hardened Steel Cutting Blade
- Adjustable Paper Clamp
- Pre-assembled and ready-to-use out of the box
- Scratch resistant coating on grid surface
- Clamp wheel for better holding thicker paper
- Ruler in inches and clear embossed grid for precise cutting
- Cutting handle bar and adjustable backstop for better handling
- Non-skid rubber feet for table use
- CE Certified
Specifications
- Base Size: 21" x 15" x 1 1/2"
- Overall Size: 21" x 15" x 13 1/2" (including cutting bar)
- Maximum Cutting Width: 12"
- Best Cutting Size: Under Letter Size Paper
- Maximum Cutting Capacity: 400 Sheets (for 2.85oz Letter Paper)
- Package size: 25" x 17.7" x 11.8"
- Package Weight: 40 lbs
Whats Included:
- 1 - Desktop 400 Sheets Paper Cutter
- 1 - Blade Splint (Tool Box Cover)
Replacements
The replacements are for Newest Version of HFS 12" Paper Cutter SKU 16150
Be Sure to Compare Measurements to Your Current Paper Cutter!
Not guaranteed to work with other brands of stack cutters
WARNING: Item is extremely sharp, use extreme caution when opening package and replacing your blade and other parts.
Safety Guidelines
- Operator should read the entire manual before attempting to use the cutter.
- Never place hands below the blade, always use the included blade holder when changing the blade.
- Do not attempt to cut any material other than paper.
- Keep away from children. Store cutter with blade down, clamp down, and handle removed.
Initial Assembly
- Remove the cutter from box and place on a flat surface.
- You may need to reverse the clamp using the included allen wrench. See photo to the right.
- Attach the cutting handle by sliding it over the rod. The handle doesn’t attach in any way keeping it easy to remove.
- Rotate the clamp handle clockwise to tighten the paper. It needs to be clamped very tightly to keep the paper from shifting while being cut.
- Push the safety button while lowering the blade handle.
- Firmly press the blade handle all the way down until the blade strikes the red cutting stick.
- Raise the blade and clamp to remove your cut paper.
Operation
- Rotate the clamp handle counter clockwise to lift the clamp
- Lift the blade handle to raise the blade to max height, the rear safety button should engage.
- Move the fence to your desired cutting length, and insert paper square against side and back fences.
- Rotate the clamp handle clockwise to tighten the paper. It needs to be clamped very tightly to keep the paper from shifting while being cut.
- Push the safety button while lowering the blade handle 6. Firmly press the blade handle all the way down until the blade strikes the red cutting stick.
- Raise the blade and clamp to remove your cut paper.
Troubleshooting
Maintenance All moving parts with screws should be checked periodically to be sure the screws are tight. They may become loose in the process of transportation. Users should also check and tighten the screws after more than 200 cutting cycles. All moving parts should be lubricated periodically to maintain performance and equipment life.
Replacing The Feet The cutter has 4 molded plastic feet, one at each corner. These feet keep the cutter from slipping and keep it level. These feet can be broken during shipping, or if the cutter is dropped. We have included one extra foot just in case of shipping damage, but we are happy to send more. Please contact us within 5 business days of receiving your cutter to let us know you need replacement feet. If feet are later damaged by accident, we do have them available for purchase as well. The feet can be attached by a screw or by an adhesive film, simple pull the broken foot off and attach the new one in its place.
Replace Cutting Stick
The cutting stick is the red surface that the blade contacts during the cutting process. Eventually the blade will cause a deep groove in the cutting stick which will cause issues with cutting the last few sheets of paper, what that happens it needs to be rotated or replaced. Each side of the stick can be used twice by flipping the stick length-wise, then you can rotate to a fresh side of the stick for 8 usable areas total.
1. Turn the cutter upside down
2. Locate two screws that go horizontally into the cutting stick
3. Loosen the screws, then push the stick out through the top of the cutter
4. Replace the stick with a fresh side under the blade
5. Tighten the screws back in (not too hard, you don't want to make indentations in the stick
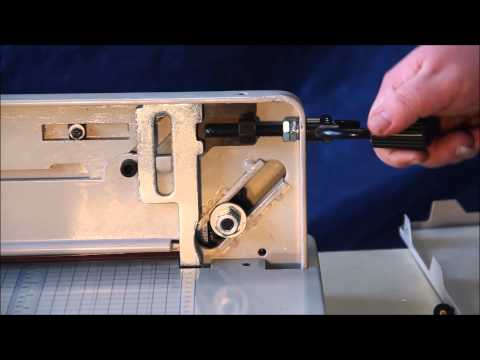
Adjust the height of the blade
Note: If you encounter a situation where the paper cannot be cut: first lower the empty knife and observe where the front blade (knife edge) meets the red pad. The gap between the rear edge of the blade and the red pad is 2mm (low front and high back) for the best cutting Cut state. If it is too flat or the height difference between the front and rear ends is too large, please refer to the following methods to make adjustments.
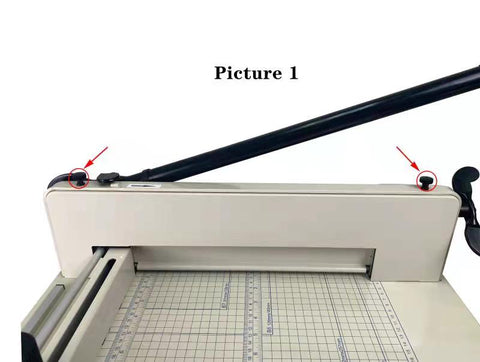
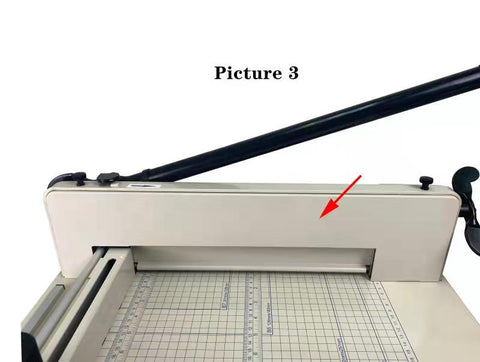
Remove the hood screws (two on the top of the knife holder and two on the bottom of the chassis) and then open the cover (remove the cover according to the steps in the figure below).

The first case: if the rear end cannot be cut off (close to the shake handle position)
Loosen the nut 360 degrees in the direction shown in the figure.
Adjust the uppermost nut in the direction of ② as shown in the figure.
Then put a piece of paper for trial cutting. When the paper cutting handle is pressed down, the adjustment block will automatically lift up until the blade can completely cut the paper (it can also be adjusted to a height of 1-2MM between the front and rear).
After adjustment, tighten the nut ① in the opposite direction.
The second case: If the front end cannot be cut (close to the knife leg position)
Loosen the nut 360 degrees in the direction shown in the figure.
Adjust the screw according to the figure ②.
Then put a piece of paper for trial cutting until the leading edge of the paper can be cut. After adjustment, tighten the nut ① in the opposite direction.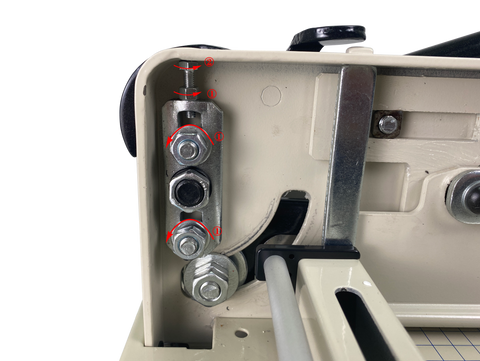
Blade Leveling Instructions
When the blade is fully down it should be slightly lower in the "back" of the cutter (near the hinge). If it isn't, there is a way to adjust is. First try turning the cutting stick to a fresh side. It can be rotated 8 ways before it needs to be replaced. On the bottom (underneath) of the cutter there are 2 bolts that go horizontally into the side of the cutting stick. Loosen those and push the stick out through the top of the cutter. Turn to a fresh side and put it back into place.
If that doesn't help:
Please refer to the videos on our website or contact customer service for instructions on how to remove the side access panel. Once it's off, follow these steps:
Look at the back end of the cutter (where the hinge is) and you will see a silver metal plate with three bolts aligned vertically. Loosen the top and bottom bolt only, also note at the top of the silver plate there is a small set screw. Adjust the entire silver plate (which will move the entire hinge) up and down to adjust the angle of the blade on the red cutting stick. It should contact the back of the cutting stick first, and still be -1/16-1/8" or so away from touching in the front.
The assembly may be hard to move at first, since it's been bolted in place from the factory. Often you can use a screwdriver or pry bar to get it to start moving. Loosening the middle bolt on the silver plate may help as well, though it usually isn't necessary.
Replacing The Blade The cutting blade is made of heat-treated high-carbon steel and is designed for repeated use. However, over time the blade will become dull, and not perform to the highest standards. Cutting heavy paper or cardboard will dull the blade more quickly than thinner paper stock. A dull blade will not cut accurately. To remove the blade, place the blade holder under the blade and lower the blade until it rests on the holder. Remove the screw holding the blade in place, then raise the blade mechanism which will leave the blade sitting in the holder. The blade can be sharpened by a professional sharpening service for knives, lawn mowers, swords, and more. The blade can also be replaced with a new blade.
Support / Warranty / Shipping Damage / Replacement Parts
If your cutter arrived damaged, or you have a warranty claim, HFS will take care of all issues. We also have videos available and updated information on design changes and commons questions about the cutter.
The limited-warranty period on our cutters is 1-Year from Date of Purchase. The warranty does not cover blades, feet, knobs, cutting sticks, safety pins, or customer negligence. Shipping damage claims must be submitted within one week of received the product. Returns are accepted within 30 days of date of purchase, no exceptions.
Contact Us
If the above website doesn’t help you may contact us at the following email:
info@hfsus.com
HFS warrants that the Product (“Product”), when properly used and installed in conformance with HFS’ specifications for such Product, will be free from defects in materials and workmanship and will substantially conform to HFS specifications for such Product during the Warranty Period.
LIMITED WARRANTY.
- What is Covered. Except as specifically excluded below, HFS warrants, to direct Customer only, that any product manufactured by HFS and sold to Customer (a) conforms to HFS’ published and/or written specifications and (b) is free from defects in material or workmanship. This warranty expires one (1) year from the date of delivery of the product to Customer.Warranties are non-transferable, only the original purchaser will receive warranty benefits.
- Please note that chemical products are sold without any warranty, whether expressed or implied. This includes, but is not limited to, warranties of merchantability, fitness for a particular purpose, or non-infringement. Due to the inherent variability in the storage, handling, and usage of chemical substances, we cannot guarantee the product’s performance under specific conditions. It is the responsibility of the buyer to conduct their own tests and evaluations to ensure the product's suitability for their intended applications. The seller assumes no responsibility for any potential risks, damages, or losses resulting from the use of the chemical products.
What is Not Covered
Except as otherwise specifically provided in this agreement, HFS and its subsidiaries or affiliates make no further warranties, either expressed or implied, including but not limited to the implied warranties of fitness for a particular purpose, merchantability, title, and non-infringement. The limited warranty does not cover and is voided by any and all illegal uses, misuse, abuse, modifications, damages related to normal wear and tear, improper preparation, installation, or use, improper cleaning and maintenance, failure to follow care instructions, and the like.
Additionally, this limited warranty does not cover damage resulting from misuse, accident, negligence, modification or alteration of hardware or software, tampering, unsuitable environments beyond product specifications, improper maintenance, or failure caused by external products not provided by HFS. There is no warranty for uninterrupted or error-free operation or for defects in design. No warranty is provided for loss or damage to valuables, and all equipment must be tested prior to use. Furthermore, there is no warranty for products with removed or altered identification labels.
HFS does not provide any other warranties, including the implied warranties of merchantability and fitness for a particular purpose. In some jurisdictions, limitations on implied warranties may not apply. Consumable maintenance items, such as gaskets, seals, cutter blades, pump oil, and cutting sticks, are not covered under this warranty as they are designed to be replaced periodically. HFS is not responsible for returning products not covered by this limited warranty.
UNLAWFUL USES
Customer agrees to not use any products sold by HFS for any unlawful or illegal purposes or for use which product was not intended for including any alteration of the product. Customer agrees to indemnify, defend, and hold harmless HFS, its subsidiaries and affiliates, and their respective officers, directors, employees, agents, representatives and shareholders, predecessors and successors, from and against any and all claims, demands, causes of action, damages, losses, liabilities, judgments, taxes, costs, fees and expenses (including, without limitation, reasonable costs and expenses of investigation and settlement and reasonable attorneys’ fees and expenses), to the extent arising out of or relating to any unlawful or illegal use of products sold by HFS. Such indemnification obligations shall survive the expiration or termination of this Agreement for any reason.
LIMITATION OF LIABILITIES. TO THE MAXIMUM EXTENT PERMITTED BY LAW, UNDER NO CIRCUMSTANCES WILL HFS OR ITS DIRECTORS, OFFICERS, EMPLOYEES, AGENTS, SUBSIDIARIES OR AFFILIATES BE LIABLE FOR ANY CONSEQUENTIAL, INDIRECT, SPECIAL, PUNITIVE, EXEMPLARY, MULTIPLIED, OR INCIDENTAL DAMAGES OR LOST PROFITS, WHETHER FORESEEABLE OR UNFORESEEABLE, OR PREJUDGMENT INTEREST OR ATTORNEYS’ FEES OR COSTS BASED ON CLAIMS OF CUSTOMER OR ANY OTHER PARTY ARISING OUT OF BREACH OR FAILURE OF EXPRESS OR IMPLIED WARRANTY, BREACH OF CONTRACT, MISREPRESENTATION, NEGLIGENCE, STRICT LIABILITY IN TORT, FAILURE OF ANY REMEDY TO ACHIEVE ITS ESSENTIAL PURPOSE, OR OTHERWISE.
PRIVACY AND NON-DISCLOSURE. While still complying with all applicable laws, HFS will endeavor to preserve Customer’s identity from disclosure to third parties.
FORCE MAJEURE. HFS shall not be responsible or liable for any failure to perform hereunder if such failure is caused by acts of God, acts of government, strikes or labor disputes, failures of transportation, fire, flood, disease, epidemic or other casualty, failures of subcontractors or suppliers, or any other cause or causes that are beyond HFS’ reasonable control.
GOVERNING LAW AND VENUE. This Agreement shall be governed by the procedural and substantive laws of the State of California. Any litigation arising under or pursuant to this agreement shall be conducted in Los Angeles County.
DISPUTE RESOLUTION. Any dispute arising between Customer and HFS arising out of or in connection with this Agreement or the interpretation, breach, or enforcement thereof, including the determination of the scope or applicability of this agreement to arbitrate (collectively referred to as a “Dispute”) shall be resolved as follows: (1) the parties shall first attempt to resolve any Dispute through informal, good-faith negotiations and/or mediation; (2) If the Dispute is not informally resolved within thirty (30) calendar days of written notice of the Dispute by either party to the other, then the DISPUTE SHALL BE FINALLY SETTLED BY BINDING ARBITRATION administered pursuant to JAMS’ Comprehensive Arbitration Rules and Procedures and in accordance with the Expedited Procedures in those Rules (or, if mutually agreed to by the parties, pursuant to JAMS’ Streamlined Arbitration Rules and Procedures). The arbitrator shall not have any power to alter, amend, modify or change any of the terms of this Agreement nor to grant any remedy which is either prohibited by the terms of this Agreement, or not available in a court of law. The arbitrator is not empowered to award punitive or exemplary damages, except where permitted by statute, and the parties waive any right to recover any such damages. In the event this arbitration agreement or a resulting arbitration award is subject to review by a court, such court shall use the arbitrary and capricious standard of review. The costs of any arbitration, including any JAMS administration fee, the arbitrator’s fee, and costs for the use of facilities during the hearings, shall be borne equally by the parties to the arbitration; provided, however, that all costs and expenses of the arbitration, including the arbitrator's fees and costs, expert fees and costs, and reasonable attorneys’ fees and costs incurred, shall be awarded to the prevailing or most prevailing Party as determined by the arbitrator. Judgment on a final award rendered by the arbitrators may be entered and enforced in a Court venue in Los Angeles County.
ASSIGNMENT
No right or interest in this Agreement may be assigned by Customer without the written permission of HFS, and any other attempted assignment shall be wholly void and totally ineffective for all purposes. This provision prohibits assignment of rights only; the right to delegate duties is in no way impaired by reason of this provision.
EFFECT OF PARTIAL INVALIDITY. If a court or an arbitrator of competent jurisdiction holds any provision of this Agreement to be illegal, unenforceable, or invalid for any reason, the validity and enforceability of the remaining provisions shall not be affected.
ENTIRE AGREEMENT; MODIFICATION BY SUBSEQUENT WRITING: This agreement contains the entire agreement between the parties. No other agreement, statement, or promise, written or oral, made on or before the effective date of this agreement will be binding on the parties. This written agreement supersedes all prior agreements. This agreement may be modified by subsequent agreement of the parties only by an instrument in writing.


